






Core requirements
The advanced setup is A, and the budget setup is B.
- Hard points
- Level 90 · 101 points
- Cast rate
- A 105% / B 105%
- Telekinesis
- 20 hard points
- Absorption
- A Prebuff level 40 · 95%
Attributes
Total attributes with equipment · hard points shown separately
| Strength | Before equipping A 91 / B 156Hard points A 51 / B 146 · A Excludes boots' Strength |
|---|---|
| Dexterity | 0 hard pointsA Scythe requirement 41 |
| Vitality | A 0 allocated / B 100B has lower Energy Shield absorption |
| Energy | A 409 / B 214 hard pointsIncludes 15 attribute quest points |
Attribute calculations and equipment changes
Strength
A uses an Infinity Scythe and Sandstorm Trek. Base Strength 10 + Torch 15 + Annihilus 15 + 51 allocated = 91, enough to equip the boots without their own Strength bonus. B needs 156 Strength for a Spirit Monarch, or 146 allocated points without bonuses. A does not use a Monarch on swap. A gains the boots' Strength bonus after equipping them. The listed 91 is the pre-equip requirement, excluding their own bonus.
Dexterity
A meets 41 with base 25 + Torch and Annihilus 30. B uses a Crescent Moon Crystal Sword and Monarch, requiring no extra Dexterity.
Vitality
A is a softcore Energy build with 95% Energy Shield and sufficient mana recovery. B has a lower prebuff level and allocates 100 Vitality. Retreat immediately if poisoned or out of mana.
Energy
From 460 total points at level 90, A subtract 51 Strength to leave 409; B subtract 146 Strength and 100 Vitality to leave 214 for Energy. Recalculate required stats whenever equipment bonuses change.
Skills
Level 90 · 101 hard points
Main skills and synergies

Prerequisite · support 1 point each



Includes 12 quest points; equipment skill bonuses are excluded. Unlisted skills have 0 points. A and B use the same allocation.
Investment order
 Nova 20 and
 Static Field Build the synergy first while securing
 Teleport·
 Warmth.
Before switching to Energy Shield,  Telekinesis to 20, then
 Lightning Mastery to completion. At level 90, Energy Shield has 15 hard points.
At 91–95, raise Energy Shield to 20, then put the remaining 4 points into Warmth 5 . If prebuffing already reaches level 40, move those extra Energy Shield points to Warmth as a separate respec.
Equipment skill bonuses and allocation notes
A/B Hard-point allocation is the same, but equipment bonuses and the mana/Vitality split differ. B should not be assumed to have 95% Energy Shield.
With 20 hard points in Telekinesis, each 1 damage absorbed costs 0.75 mana. Equipment bonuses to Telekinesis do not improve this ratio.
A·B Shared · Level 90, 101 points
Open this allocation in the simulator ↗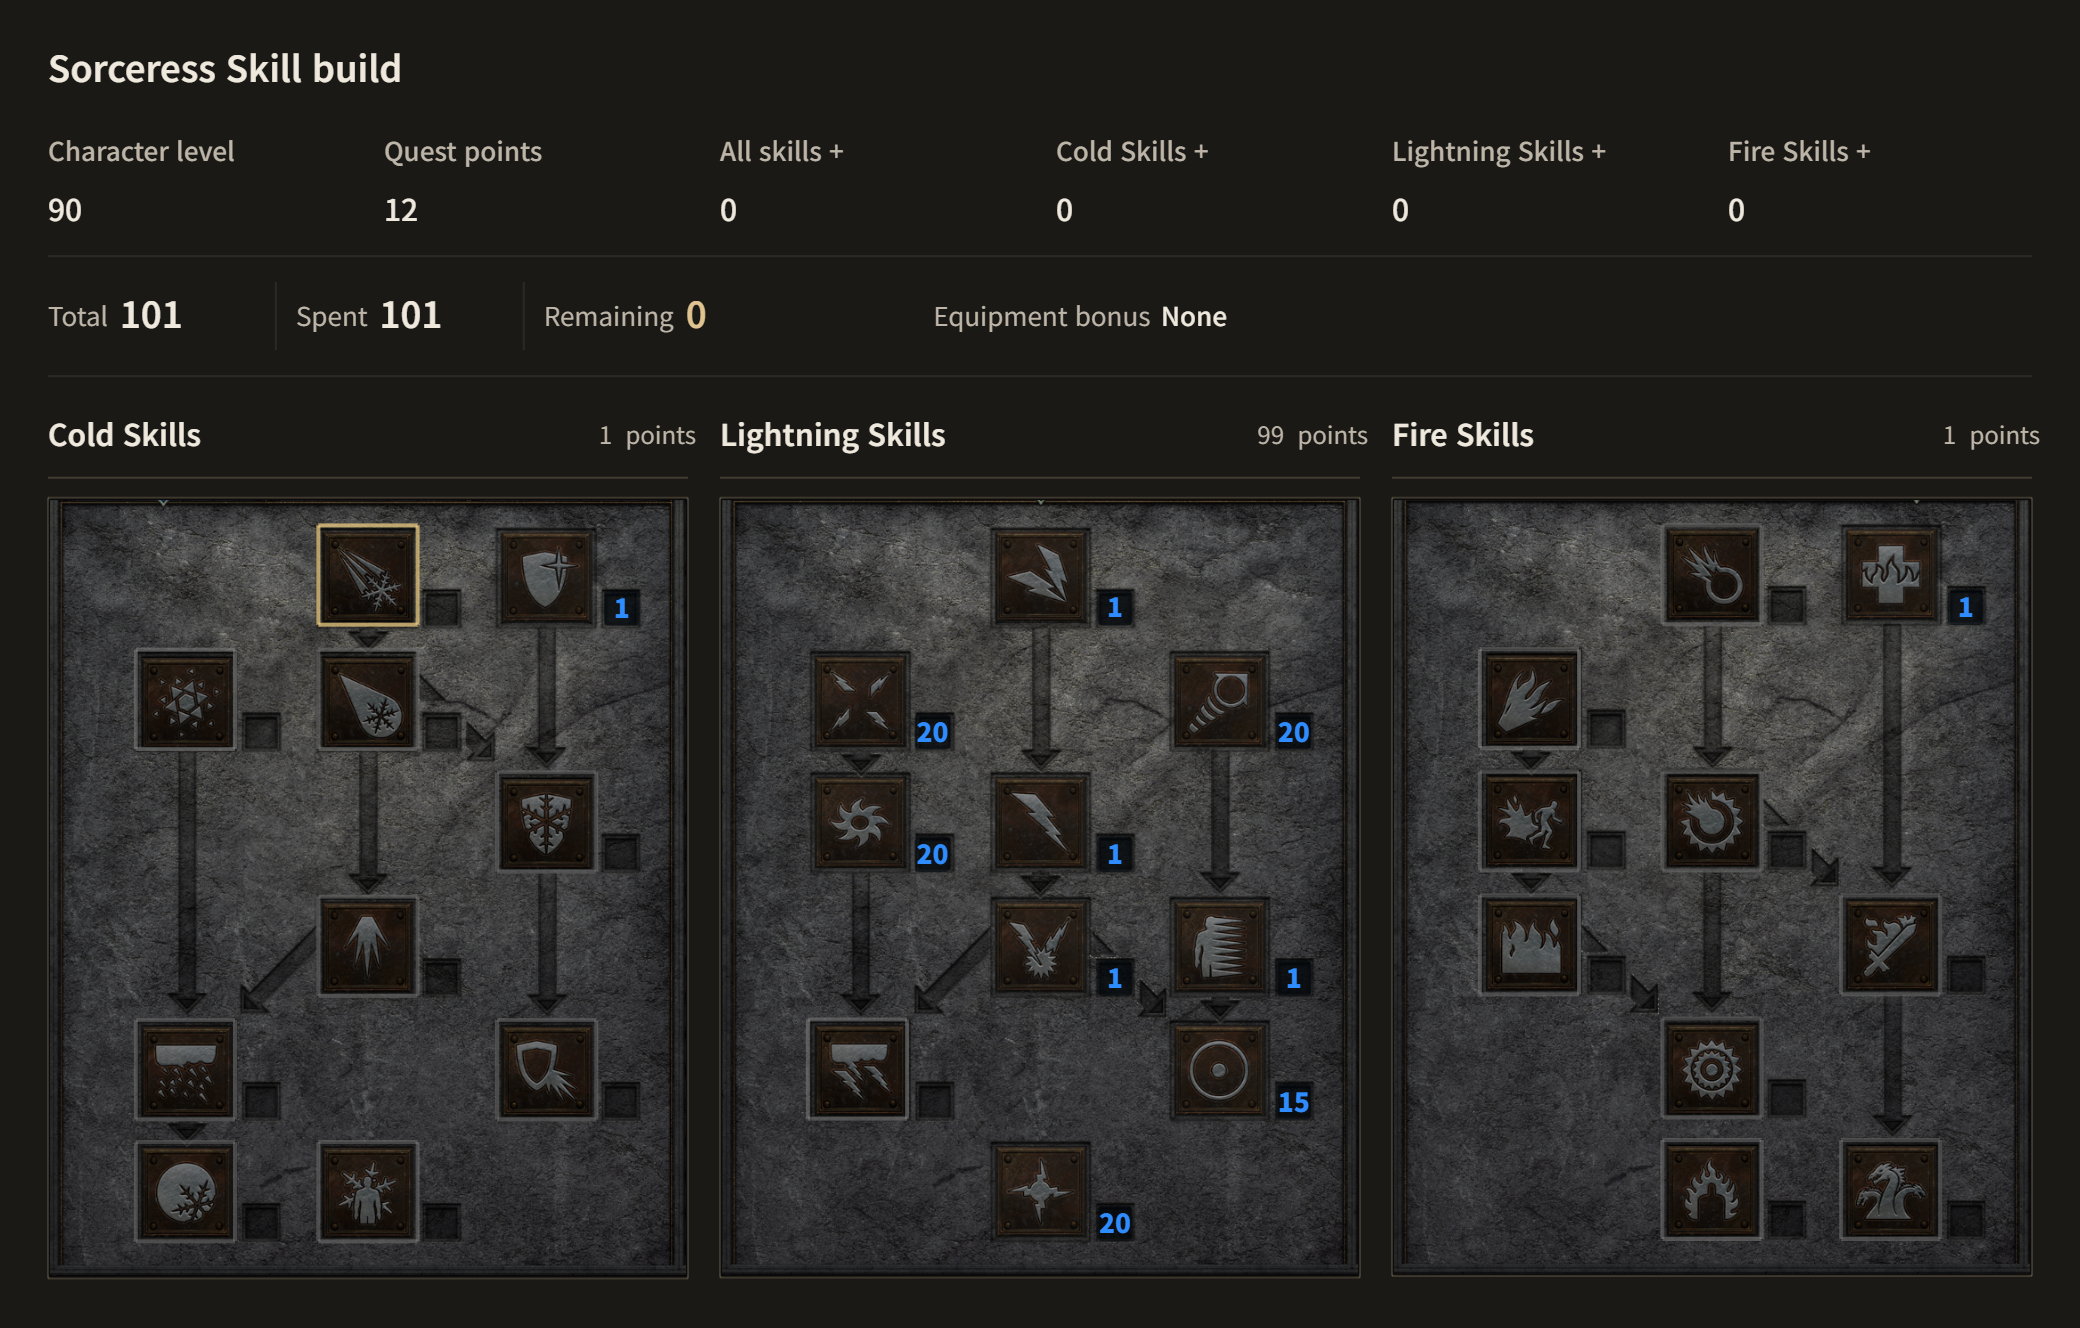
Equipment
A / B: compare modifiers and replacement requirements.
| Slot | Advanced A | Budget B | Conditions |
|---|---|---|---|
| Weapon | A Runeword Infinity | B Runeword Crescent Moon | A Self-wielded Conviction and resistance reduction / B Crescent Moon |
Weapon choice and replacement detailsA · Setup requirements4-socket non-ethereal Scythe Enemy lightning resistance -45 to -55% · Conviction 12 B · Setup requirements3-socket Crystal Sword Enemy lightning resistance -35% Selection rationale and replacementsThe resistance reduction on self-wielded Infinity applies to your character. B has no Conviction, so do not assume the same farming coverage as Infinity. | |||
| Shield | AEmpty hand | B Runeword Spirit | A Two-handed / B Requires 35% FCR |
Shield choice and replacement detailsB · Setup requirements4-socket Monarch 35% Faster Cast Rate required Selection rationale and replacementsA uses two-handed Infinity. B needs 35% FCR on the shield. | |||
| Helm | A Griffon's Eye | B Runeword Lore | A 25% FCR and enemy lightning resistance reduction |
Helm choice and replacement detailsA · Setup requirements25% FCR · enemy lightning resistance reduction B · Setup requirements2-socket light helm +1 skills · lightning resistance Selection rationale and replacementsA provides offensive or defensive bonuses, while B provides +1 skills at a low cost. | |||
| Armor | A Skin of the Vipermagi | BSkin of the Vipermagi | 30% FCR · reduces damage passing through Energy Shield |
Armor choice and replacement detailsA · Setup requirements30% FCR · magic damage reduction · resistances B · Setup requirements30% Faster Cast Rate · all resistances Selection rationale and replacementsSkin of the Vipermagi provides 30% FCR, all resistances and magic damage reduction without a Strength bonus. It helps against damage passing through Energy Shield while maintaining 105% FCR. | |||
| Gloves | A Magefist | BMagefist | Keep 20% FCR in both setups |
Glove choice and replacement detailsA · Setup requirements20% Faster Cast Rate · mana regeneration B · Setup requirements20% FCR · boosts Warmth Selection rationale and replacementsMagefist's 20% FCR counts toward the casting total. Its +1 Fire Skills applies to fire spells and Warmth. | |||
| Belt | A Arachnid Mesh | B Nightsmoke | A 20% Faster Cast Rate / B Resistances and mana |
Belt choice and replacement detailsA · Setup requirements20% Faster Cast Rate · +1 to All Skills B · Setup requirementsAll resistances 10 · Mana 20 Selection rationale and replacementsB returns mana based on physical damage actually dealt to life. Damage Taken Goes to Mana does not refund all damage or Energy Shield's mana loss. | |||
| Boots | A Sandstorm Trek | B Rare run/walk and resistance boots | Prioritize poison resistance · A Invest without counting the boots' Strength |
Boot choice and replacement detailsA · Setup requirementsTarget 15 Strength · poison resistance Selection rationale and replacementsA meets 91 Strength without counting Sandstorm Trek's own Strength bonus. B uses resistance boots, so no Strength bonus is counted. Fill poison resistance first. | |||
| Amulet | A Sorceress FCR amulet | B Skill and FCR amulet | A·B 10% Faster Cast Rate completes 105% total |
Amulet choice and replacement detailsSelection rationale and replacementsA 25+30+20+20+10=105%. B reaches 35+30+20+10+ring 10=105%. | |||
| Ring 1 | A The Stone of Jordan | BMana/resistance ring | A Stone of Jordan for mana and Energy Shield levels |
Ring 1: choice and replacement detailsA · Setup requirements+1 skills · maximum mana Selection rationale and replacementsAdds mana and skills. If resistances are low, prioritize survival over a small damage increase. | |||
| Ring 2 | AThe Stone of Jordan | BCast rate/mana ring | A Second Stone of Jordan / B 10% Faster Cast Rate |
Ring 2: choice and replacement detailsA · Setup requirements+1 skills · maximum mana Selection rationale and replacementsB has no FCR on the belt, so this ring's 10% is required. | |||
Mercenary and weapon swap
| Slot | Advanced A | Budget B | Conditions |
|---|---|---|---|
| Mercenary | A Act 2 Prayer Runeword InsightRuneword Cure Runeword Chains of Honor | B Act 2 Prayer Runeword Insight / Tal Rasha's Horadric Crest Runeword Treachery | Maintain Meditation · life recovery |
Mercenary detailsOperating requirementsA uses Cure, which has no life steal, so the armor supplies it. B uses life steal from the helm. Healing and Cleansing help manage poison but do not replace poison resistance. | |||
| Weapon swap | A made in a +3 Energy Shield base:  Runeword Memory | BRuneword Memory or a staff with +Energy Shield | A Verify prebuff level 40 |
Swap detailsOperating requirementsA Hard points 15 + Memory 9 + other equipment, Torch and Annihilus 11 + Lightning skill charms 5 = 40. Memory's 9 comes from +3 Sorceress skills, +3 Energy Shield and +3 on the base. B should not be shown as 95% if these requirements are not met. | |||
Upgrade order
- Use Crescent Moon, 35% FCR Spirit and Skin of the Vipermagi to reach B and its 105% target.
- First improve the Insight mercenary's survival, poison resistance and total mana.
- Combine Griffon's Eye, self-wielded Infinity, Arachnid Mesh and a +2 skills/10% FCR amulet to retain 105% after removing the shield.
- Once you have a +3 Energy Shield base for Memory and 5 Lightning skill charms, A can respec to its 95% shield and Energy-based stats.
Playstyle
- Prebuff
Cast Energy Shield and Frozen Armor with Memory, then return to the main weapon.
Prebuff details
Details
A must verify level 40 Energy Shield in the actual tooltip. Swapping weapons after casting preserves the shield's absorption.
- Engaging
Teleport to the edge of a pack rather than its center.
Engaging: details
Details
Even with a strong shield, repeated hits can drain mana and prevent both attacks and Teleport.
- Attacking
Lower enemy life with Static Field, then repeatedly cast Nova.
Attacking: details
Details
Static Field 20 is also a direct synergy for Nova.
- Mana management
Keep the Insight mercenary alive and retreat immediately if mana drops sharply.
Mana management details
Details
Do not expect self-wielded Infinity to recover mana. Keep rejuvenation potions for emergencies.
- Handling poison
Use Cure, antidote potions and life recovery when poisoned.
Handling poison: details
Details
Poison bypasses Energy Shield. Prioritize 75% poison resistance even with Cure's aura.
- B Farming coverage
Do not force a full clear of areas with mixed immunities, such as the Hell Pit.
B Farming coverage: details
Details
Farm areas with few lightning immunes and repeat Nightmare runs to fund A .
Mechanics and notes
Energy Shield and resistances
Damage redirected to Energy Shield is processed before ordinary elemental resistance. High resistance does not reduce shield mana loss by the same percentage. Poison bypasses the shield.
Telekinesis calculation
The base mana cost is 2 times absorbed damage, reduced by 0.0625 per 1 hard point in Telekinesis. At 20 hard points, 2−20×0.0625=0.75.
Mana and damage
20 hard points in Static Field give Nova a +100% synergy. A applies Infinity's enemy lightning resistance reduction to Nova because the character wields it.
Strengths, limitations and farming style
Strengths
Wide close-range attacks and Teleport make it fast and responsive.
A fully developed Energy Shield and mana recovery support continuous farming.
Limitations
A has a high cost for Infinity, Griffon's Eye and mana equipment.
Vulnerable to poison and mana depletion, while B has limited ways to handle immunities.
Additional variants
Mercenary Infinity variant
Keeping Crescent Moon and Spirit while giving Infinity to the mercenary makes your own FCR and resistances easier to manage. Losing Insight's Meditation requires rebuilding your mana recovery.
Vitality Nova
Reducing Energy Shield from 15 to 0 and Telekinesis from 20 to 1 frees 34 points. Put 19 into Warmth, from 1 to 20, and 15 into Thunder Storm, from 0 to 15. This totals 101 points and is a separate allocation that also changes Energy-based stats to Vitality.